Step 4: Derby Network Server
Introduction
As explained in the "Embedded Derby" section, an application can embed Derby, which means that the Derby engine runs in the same JVM as the application.
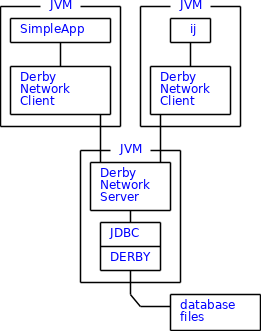
However, an application can also access a Derby database using the more familiar client/server mode. This is achieved via a framework that embeds Derby and handles database requests from applications, including applications running in different JVMs on the same machine or on remote machines. The Derby Network Server is such a framework. It embeds Derby and manages requests from network clients, as depicted in Figure 2.
Figure 2: Derby Network Server Architecture
This section shows how to start the Derby Network Server, configure your environment to use the Derby Network Client JDBC driver, and compile and run a simple Java application that uses the network server. The information presented here is minimal, just enough to help get new users started. For complete information, see part one of the Derby Server and Administration Guide.
Derby Network Server
First set the DERBY_INSTALL environment variable.
Configure environment
To start or stop the Network Server, set your CLASSPATH to include the jar files listed below:
- derbynet.jar: contains the code for the Derby Network Server and a reference to the engine jar file (derby.jar)
- derbytools.jar: contains Derby tools
You can set your CLASSPATH explicitly with the command shown below:
Windows: C:\> set CLASSPATH=%DERBY_INSTALL%\lib\derbytools.jar;%DERBY_INSTALL%\lib\derbynet.jar;.
UNIX: $ export CLASSPATH=$DERBY_INSTALL/lib/derbytools.jar:$DERBY_INSTALL\lib\derbynet.jar:.
You can also use the script that the Derby software distribution provides to set CLASSPATH. Change directory to the DERBY_INSTALL/bin directory, then execute setNetworkServerCP.bat (Windows) or setNetworkServerCP (UNIX), as shown below:
Windows: C:\> cd %DERBY_INSTALL%\bin C:\Apache\db-derby-10.4.1.3-bin\bin> setNetworkServerCP.bat
UNIX: $ cd $DERBY_INSTALL/bin $ . setNetworkServerCP
Start Network Server
Start the Network server by executing the startNetworkServer.bat (Windows) or startNetworkServer (UNIX) script. This will start the Network Server up on port 1527 and echo a startup message:
Windows: C:\Apache\db-derby-10.4.1.3-bin\bin> startNetworkServer.bat Security manager installed using the Basic server security policy. Apache Derby Network Server - 10.4.1.3 - (648739) started and ready to accept connections on port 1527 at 2008-04-28 17:13:13.921 GMT
UNIX: $ startNetworkServer Security manager installed using the Basic server security policy. Apache Derby Network Server - 10.4.1.3 - (648739) started and ready to accept connections on port 1527 at 2008-04-30 09:35:55.871 GMT
Messages will continue to be output to this window as the Network Server processes connection requests.
The Network Server starts Derby, so you'll find the derby.log error log in the directory where you start the Network Server.
An easier way: derbyrun.jar
Furthermore, it is much easier to start Network Server now than before, due to various jar file improvements. With the latest releases, the entire sections "Configure environment" and "Start Network Server" could actually be replaced with just one command line:
Windows: C:\Apache\db-derby-10.4.1.3-bin\lib> java -jar derbyrun.jar server start Security manager installed using the Basic server security policy. Apache Derby Network Server - 10.4.1.3 - (648739) started and ready to accept connections on port 1527 at 2008-04-28 17:13:13.921 GMT
UNIX: $ java -jar derbyrun.jar server start Security manager installed using the Basic server security policy. Apache Derby Network Server - 10.4.1.3 - (648739) started and ready to accept connections on port 1527 at 2008-04-30 09:35:55.871 GMT
Sample Application
Open a new window and set the DERBY_INSTALL environment variable.
Configure environment to use Derby Network Client JDBC driver
To use the Derby Network Client JDBC driver, set your CLASSPATH to include the jar files listed below:
- derbyclient.jar: contains the JDBC driver
- derbytools.jar: optional, provides the ij tool
You can set your CLASSPATH explicitly with the command shown below:
Windows: C:\> set CLASSPATH=%DERBY_INSTALL%\lib\derbyclient.jar;%DERBY_INSTALL%\lib\derbytools.jar;.
UNIX: $ export CLASSPATH=$DERBY_INSTALL/lib/derbyclient.jar:$DERBY_INSTALL/lib/derbytools.jar:.
You can also use the script that the Derby software distribution provides to set CLASSPATH. Change directory to the DERBY_INSTALL/bin directory, then execute the setNetworkClientCP.bat (Windows) or setNetworkClientCP (UNIX) script as shown below:
Windows: C:\Apache\db-derby-10.4.1.3-bin\bin> setNetworkClientCP.bat
UNIX: $ . setNetworkClientCP
Test network server connection with ij
An embedded connection URL that creates and connects to a database looks like this:
java org.apache.derby.tools.ij ij> connect 'jdbc:derby:MyDbTest;create=true';
A Derby Network Client connection URL is very close; just add //localhost:1527/ before the database name:
java org.apache.derby.tools.ij ij> connect 'jdbc:derby://localhost:1527/MyDbTest;create=true';
What is the physical location of the newly created database?
If you use the embedded driver, by default the database is created in the same directory in which ij was started up. If you use the Derby Network Client JDBC driver, by default the database is created in the directory where the Network Server was started up; in other words, in DERBY_INSTALL/bin.
Derby provides many ways to specify the actual location. For example, the connection URL below specifies a full path for the database location:
java org.apache.derby.tools.ij ij> connect 'jdbc:derby://localhost:1527//home/bill/DerbyDb/MyDbTest;create=true';
The Developer's Guide provides information about where Derby looks for databases:
Copy sample application
This section uses the same sample application that the "Embedded Derby" section uses.
By default this application runs in embedded mode. If you pass it the derbyclient argument at run time, then it will create and connect to the database using the Derby Network Client JDBC driver instead.
A quick look at the code
The SimpleApp.java application spends most of its time creating a table, inserting data into that table, and selecting the data back, demonstrating many JDBC calls as it does so. This section highlights the JDBC calls that make this specifically a client/server Derby application. The "Embedded Derby" section shows how to turn the same code into an embedded application.
Load the Client JDBC Driver
When executed with the derbyclient argument, the SimpleApp application loads the Derby Network Client driver with this code:
driver = "org.apache.derby.jdbc.ClientDriver"; ... Class.forName(driver).newInstance();
Get a Network Server Connection
When executed with the derbyclient argument, the SimpleApp application creates and connects to the derbyDB database with this code:
protocol = "jdbc:derby://localhost:1527/"; ... conn = DriverManager.getConnection(protocol + "derbyDB;create=true", props);
That connection URL, fully constructed, looks like this:
jdbc:derby://localhost:1527/derbyDB;create=true
Don't shut Derby down
If you look at the SimpleApp.java code you'll notice that it only shuts Derby down if it's running in embedded mode. When connecting via the Network Server, other applications might be accessing the same database you are; so, don't shut down the databases or Derby.
Compile Sample Application
Compile the sample application as shown below:
javac SimpleApp.java
Run Sample Application
Run the sample application like this:
java SimpleApp derbyclient
You should see the output shown below:
SimpleApp starting in derbyclient mode. Loaded the appropriate driver. Connected to and created database derbyDB Created table derbyDB Inserted 1956 Webster Inserted 1910 Union Updated 1956 Webster to 180 Grand Updated 180 Grand to 300 Lakeshore Verified the rows Dropped table derbyDB Closed result set and statement Committed transaction and closed connection SimpleApp finished
Quick question: Where is the physical location of the derbyDB database that the sample application creates?
(Answer: In the default $DERBY_INSTALL/bin location.)
Stop Network Server
Stop the Network server by executing the stopNetworkServer.bat (Windows) or stopNetworkServer (UNIX) script, as shown below:
Windows: C:\> cd %DERBY_INSTALL%\bin C:\Apache\db-derby-10.4.1.3-bin\bin> setNetworkServerCP.bat C:\Apache\db-derby-10.4.1.3-bin\bin> stopNetworkServer.bat
UNIX: $ cd $DERBY_INSTALL/bin $ . setNetworkServerCP $ stopNetworkServer
The window running the NetworkServer should output a message confirming the shutdown.
Note that, as with starting the server, there is also an easier way to shut down the server. For example:
Windows: C:\> java -jar %DERBY_INSTALL%\lib\derbyrun.jar server shutdown
UNIX: $ java -jar $DERBY_INSTALL/lib/derbyrun.jar server shutdown
Run derbyrun.jar without arguments for further usage information. derbyrun.jar has been included with Derby releases since the 10.2 release series.
Next Steps
Network Server Options
By default, the Derby Network Server only accepts requests from the localhost on port 1527. You can modify the Network Server to:
- Listen on a port other than the default.
- Accept requests from outside the localhost.
- Run in the Java 2 Security Manager for increased security, which we strongly recommend.
For more information about these options, and more, see the Derby Server and Administration Guide.
Embedded Server
Up until this point, this section has focused on how to start and stop the Network Server as an independent process.
Another option, called the "embedded server", allows an application to load the embedded JDBC driver for its own use and start the Network Server to allow remote access by applications running in other JVMs. The application that does this can access the database with either the embedded driver or the client driver.
Figure 3 depicts an application called MyEmbedSrvApp that loads the embedded driver and also starts up the Network Server. This allows other applications, such as ij or SimpleApp using the Derby Network Client, to connect to the same database via a client JDBC driver.
Figure 3: Derby Embedded Server Architecture
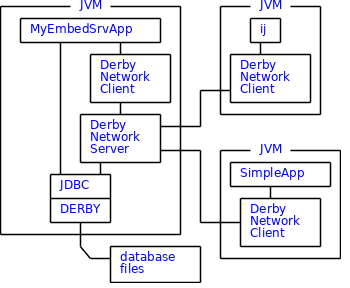
While it is certainly possible for MyEmbedSrvApp to use the Derby Network Client JDBC driver, it's probably better for it to use the embedded driver because Derby Network Client JDBC database requests incur the overhead of going out through the network. The embedded server architecture lets the application that embeds Derby retain the advantages of embedded access while also enabling remote access to the same database using another tool, such as ij. Thus, you end up with the best of both worlds: embedded and client/server.
You've reached the end of this Derby tutorial and should now understand how to use Derby in the embedded and Network Server frameworks. The "Overview" section provides suggestions for how you might use Derby with some other products.